Understanding Your Yard’s Drainage: An Illustrated French Drain Diagram
So, we’re diving into something super important for any homeowner: keeping your yard from turning into a swamp. Nobody wants a soggy lawn, right? We’re going to talk all about drainage, especially focusing on how a french drain diagram can save the day. It’s not as scary as it sounds, and we’ll break down everything you need to know to make sure water goes where it’s supposed to, keeping your home and landscape happy.
Key Takeaways
- Understanding how water moves (or doesn’t move) around your yard is the first step to fixing any drainage issues.
- Picking the right pipes and materials is a big deal for a long-lasting drainage system.
- Properly digging and lining your trenches makes all the difference in how well your french drain works.
- Always check for underground utilities and get any necessary permits before you start digging.
- Regular check-ups and cleaning will keep your drainage system running smoothly for years.
Understanding Yard Drainage Basics
Managing Excess Water Flow
We all know that water can be both a blessing and a curse for our yards. Too much of it, and suddenly we’re dealing with soggy spots, foundation issues, and unhappy plants. Managing excess water flow is about strategically directing water away from vulnerable areas like our homes and towards places where it can be safely absorbed or discharged. Think of it as playing water traffic controller for your property. We need to consider where the water is coming from – roofs, driveways, lawns – and where it should ideally go. This might involve redirecting downspouts, creating swales, or installing more complex drainage systems. The goal is to prevent water from pooling and causing problems.
Identifying Poor Drainage Areas
Spotting areas with poor drainage is the first step in fixing them. We’re looking for clues like:
- Standing water: Obvious puddles that linger long after rain.
- Soggy soil: Areas that feel consistently damp, even when it’s dry elsewhere.
- Plant problems: Plants that are struggling or dying in specific spots.
- Erosion: Signs of soil being washed away, often near downspouts or slopes.
- Mosquitoes: Increased mosquito activity in certain areas.
Identifying these problem areas allows us to focus our drainage efforts where they’re needed most. It’s like diagnosing the problem before prescribing the solution. We can use simple observation, or even walk around the yard after a rainstorm to see where the water accumulates.
Planning for Water Channeling
Once we know where the water is coming from and where it’s pooling, we can start planning how to channel it effectively. This involves thinking about the overall landscape and how water naturally flows across it. We need to consider:
- Slope: Using the natural slope of the land to our advantage.
- Distance: How far the water needs to travel to reach a suitable outlet.
- Obstacles: Identifying any barriers that might impede water flow.
- Capacity: Ensuring our drainage solutions can handle the volume of water we expect.
Planning also involves choosing the right drainage methods for our specific needs. This could range from simple solutions like regrading the soil to more complex systems like French drains or catch basins. It’s all about finding the most effective and sustainable way to manage water on our property.
Choosing the Right Drainage Materials
When planning a French drain, the materials we select play a huge role in how well the system functions and how long it lasts. It’s not just about grabbing the cheapest stuff from the hardware store; it’s about understanding what each component does and picking the best option for our specific needs. Let’s walk through some key considerations.
Selecting Solid Drain Pipe
Solid drain pipes are our workhorses for moving water from one point to another, like from a catch basin to a discharge point. The key here is to choose a pipe strong enough to withstand the soil pressure and any potential traffic above it. We usually go with PVC (polyvinyl chloride) or corrugated plastic pipes. PVC is more rigid and durable, making it great for areas with heavy loads, like under a driveway. Corrugated pipes are more flexible, which can be helpful in navigating curves or uneven terrain. Just make sure they’re buried deep enough to avoid getting crushed.
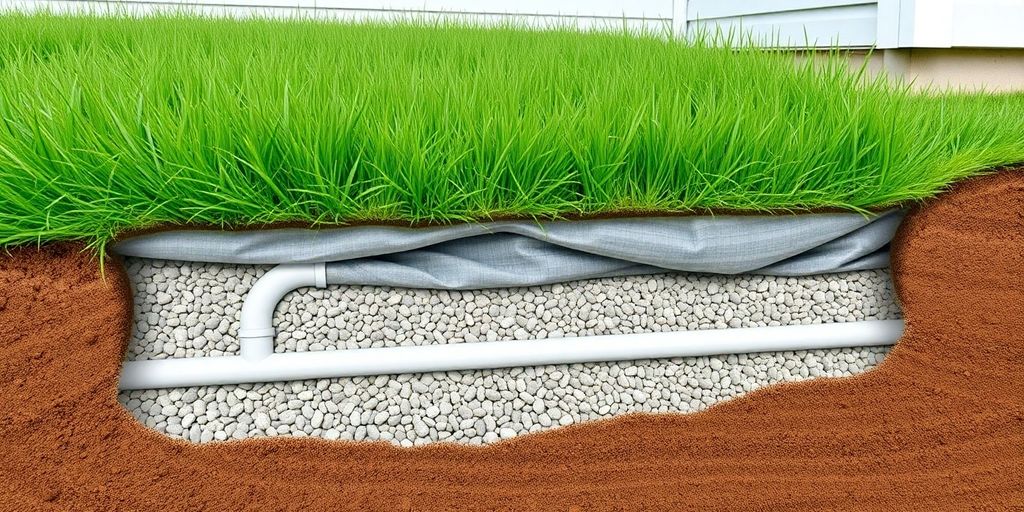
Utilizing Perforated Drainpipe
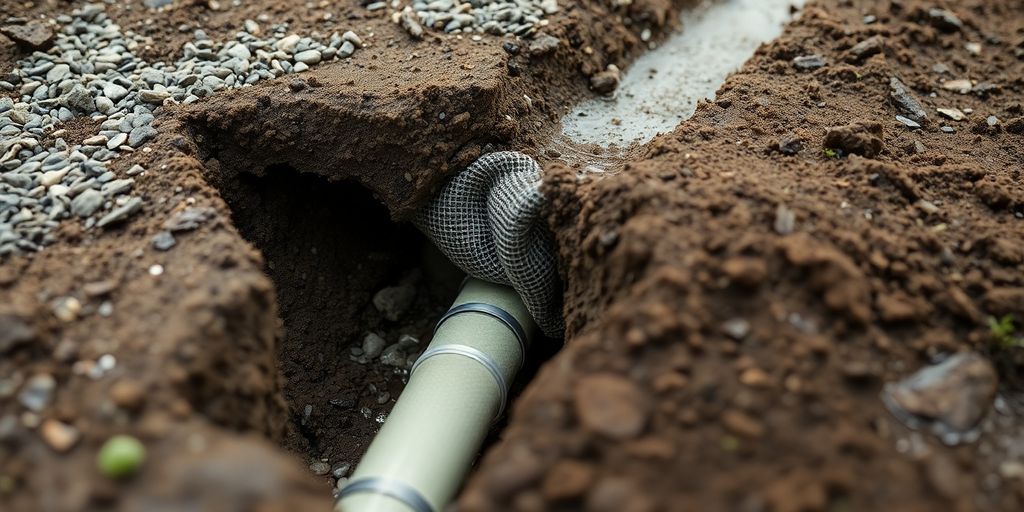
Perforated drainpipe is what makes a French drain a French drain. These pipes have small holes that allow water to seep into the pipe along its entire length. When selecting perforated pipe, we need to think about the size and spacing of the holes. Smaller holes prevent soil from getting in and clogging the pipe, but they can also restrict water flow. We typically wrap the pipe in landscape fabric to act as a filter and keep debris out. Also, consider the pipe material. Both PVC and corrugated options are available, each with its own pros and cons regarding flexibility and durability.
Matching Pipe Types and Fittings
It’s easy to overlook fittings, but they’re essential for connecting different sections of pipe and changing direction. We need to make sure that all our fittings are compatible with the type of pipe we’re using. PVC fittings require PVC glue, while corrugated pipes often use snap-together connectors or couplings. Also, think about the layout of our drainage system. We might need elbows for turning corners, Y-connectors for joining pipes, or end caps to seal off the end of a drain. Getting the right fittings ensures a watertight and efficient system.
Choosing the right materials is more than just picking pipes. It’s about understanding how each component works together to manage water effectively. We always take the time to assess our site conditions, calculate water flow, and select materials that will stand the test of time.
Laying the Foundation for Effective Drainage
Preparing the Trench for Pipe Installation
Okay, so we’ve got our materials, and now it’s time to get our hands dirty! Preparing the trench is honestly the most labor-intensive part, but it’s super important to get it right. The trench needs to be deep enough and wide enough to accommodate the pipe, gravel, and any landscape fabric we’re using.
Here’s a quick checklist:
- Mark the path of the trench using marking paint or flags.
- Dig the trench to the required depth (usually at least 12 inches, but check local codes!).
- Ensure the trench has a consistent slope for proper water flow.
Proper Placement of Perforated Pipe
Alright, we’ve got our trench dug, now let’s talk about the pipe. If we’re using perforated pipe (and we probably are for a French drain), the orientation of the holes matters. The general rule of thumb is to place the pipe with the holes facing down. This helps prevent soil from seeping into the pipe and clogging it up over time. However, there are some situations where facing the holes upwards is better, especially if we’re trying to collect surface water. It really depends on the specific drainage issue we’re trying to solve.
Lining Trenches with Landscape Fabric
Landscape fabric is our friend! It’s like a protective blanket for our drainage system. We want to line the trench with landscape fabric before we add the gravel. This fabric acts as a filter, preventing soil particles from migrating into the gravel and clogging the system. It’s a relatively inexpensive step that can significantly extend the lifespan of our French drain.
Think of landscape fabric as a long-term investment. It might seem like an extra step, but it’ll save us a lot of headaches (and digging!) down the road. It keeps the gravel clean, which keeps the water flowing freely. Trust me, future us will thank us for taking the time to do this right.
Essential Drainage System Components
Implementing a Catch Basin
Catch basins are like the unsung heroes of yard drainage. They’re designed to intercept surface runoff, preventing debris from clogging your drainage pipes. Think of them as the first line of defense against leaves, twigs, and sediment. We usually install them at low points in the yard or near downspouts to collect water before it enters the underground pipe system. It’s a simple concept, but it makes a huge difference in keeping everything flowing smoothly. We’ve found that regular cleaning of the catch basin is key to preventing backups and maintaining optimal drainage performance.
Constructing a Gravel-Filled Trench
Now, let’s talk about gravel-filled trenches. These are a core component of many drainage systems, especially French drains. We dig a trench, line it with landscape fabric, and then fill it with gravel. The gravel acts as a filter, allowing water to percolate into the ground while preventing soil from clogging the system. The size of the gravel matters; we typically use a mix of sizes to maximize drainage capacity. The landscape fabric is also important; it keeps the soil separate from the gravel, ensuring the trench continues to function effectively over time. We’ve seen firsthand how a well-constructed gravel-filled trench can transform a soggy yard into a usable space.
Building a Dry Well for Runoff
Dry wells are underground storage facilities for excess water. We often use them in areas where the soil doesn’t drain well or where there’s a lot of runoff from roofs or paved surfaces. We dig a large hole, line it with landscape fabric, and fill it with gravel or rocks. The water collects in the dry well and slowly percolates into the surrounding soil. It’s like a mini underground reservoir. We make sure to locate the dry well away from the house foundation to prevent water from seeping into the basement. Proper sizing is also important; we need to calculate the volume of runoff to ensure the dry well can handle the load. It’s a great way to manage excess water and prevent flooding.
We’ve learned that a combination of these components often provides the best drainage solution. A catch basin collects surface water, a gravel-filled trench channels it away, and a dry well provides a place for excess water to slowly dissipate into the ground. It’s all about understanding the specific needs of your yard and designing a system that works for you.
Before You Dig: Planning and Permits
Before we even think about breaking ground, there’s some essential homework to do. Rushing into a drainage project without proper planning can lead to serious headaches down the road. We need to make sure we’re not only solving our drainage issues but also doing it safely and legally. This means understanding where the water’s going, what’s underground, and what the local rules are.
Mapping Runoff Destination
First things first, we need to figure out where the water should be going. Understanding the natural flow of water on our property is key to designing an effective drainage system. We need to observe where water accumulates during heavy rains and identify the existing drainage paths. Are we directing water towards a street drain, a natural waterway, or a designated runoff area? Knowing this will help us plan the most efficient and environmentally responsible drainage solution. We don’t want to inadvertently create a problem for ourselves or our neighbors by redirecting water where it shouldn’t go.
Locating Underground Utilities
This is non-negotiable. Before we even think about digging, we must locate all underground utilities. Hitting a gas line, water pipe, or electrical cable is not only dangerous but also incredibly expensive. Most areas have a free service (like 811 in the US) that will come out and mark the location of underground utilities on our property. It’s a simple phone call that can save us a lot of trouble, and potentially our lives. Don’t skip this step!
Obtaining Necessary Building Permits
Depending on where we live, we might need a building permit for our drainage project. This is especially true if we’re altering the landscape significantly or installing structures like dry wells or retaining walls. It’s always best to check with our local building or planning department to see what permits are required. Ignoring permit requirements can result in fines, stop-work orders, and even having to undo our work. It’s better to be safe than sorry. Plus, permits often ensure that our project meets local codes and safety standards.
Ignoring local regulations can lead to significant problems. It’s always better to check with the local authorities to ensure compliance. This proactive approach can prevent costly fines and project delays, ensuring a smooth and legal drainage system installation.
Here’s a quick checklist to consider:
- Contact the local building department.
- Inquire about permit requirements for drainage projects.
- Provide a detailed site plan of the proposed work.
- Obtain all necessary approvals before starting construction.
Addressing Specific Drainage Challenges
Solving Persistent Boggy Areas
We’ve all seen those spots in our yards that just never seem to dry out, no matter what the weather’s like. These boggy areas can be a real pain, killing off grass and making it impossible to enjoy certain parts of the yard. The key to fixing these spots is to improve the soil’s ability to drain.
- Aerate the soil: Use a garden fork or core aerator to create small holes that allow air and water to penetrate.
- Amend the soil: Mix in organic matter like compost or peat moss to improve drainage.
- Install a small French drain: A short section of perforated pipe buried in gravel can redirect water away from the boggy area.
Sometimes, despite our best efforts, a boggy area persists. In these cases, consider embracing the moisture and planting water-loving plants like ferns, irises, or even a small rain garden. This can turn a problem area into a beautiful and unique feature of your landscape.
Managing Drainage on Sloped Landscapes
Sloped yards present a unique set of drainage challenges. Water tends to rush downhill, causing erosion and potentially flooding lower areas. Effective drainage on slopes requires slowing down the water flow and redirecting it safely.
- Terracing: Creating level terraces can slow down water flow and reduce erosion.
- Swales: Shallow, vegetated channels can capture and redirect runoff.
- Retaining walls: These can help to stabilize slopes and prevent soil erosion.
Integrating Drainage with Landscaping
Drainage doesn’t have to be an eyesore! We can integrate drainage solutions seamlessly into our landscaping to create a functional and beautiful yard. The goal is to make the drainage system look like a natural part of the landscape.
- Dry creek beds: These can mimic natural stream beds and provide a channel for water to flow.
- Rain gardens: These planted depressions can capture and filter runoff, creating a beautiful and eco-friendly drainage solution.
- Permeable pavers: These allow water to drain directly into the ground, reducing runoff and preventing puddles.
Grading Your Yard for Optimal Drainage
Achieving the Rough Grade
When we’re talking about yard drainage, getting the grade right is super important. The rough grade is our first shot at shaping the land to encourage water to flow away from the house and towards designated drainage areas. Our goal here is to remove or add enough soil so the surface has the height and slope we need. We usually start by getting rid of any high or low spots. When we remove soil, we keep the topsoil (the top 2-6 inches) separate from the subsoil. This way, we can put the good stuff back on top later for planting.
Making the Final Surface Smooth
After the rough grading and any construction or underground work, we move on to the final surface. This step is all about smoothing things out so it’s ready for planting. We want to make sure there aren’t any bumps or dips that could cause water to pool. This is where we really fine-tune the slope and make sure everything looks nice and even. It’s a bit like icing a cake – you want a smooth, consistent surface.
Using Mounds and Berms for Contouring
Mounds and berms are cool ways to change the landscape for both practical and aesthetic reasons. They can help with privacy, block wind and noise, and just add some visual interest to the yard. The main difference is size: mounds are smaller, while berms can be quite large. Building a mound is something we can usually handle ourselves, but a berm might need some heavy machinery and a pro. Both need a lot of soil, so it’s best to use what we already have on-site.
Adequate surface drainage requires a minimum slope of 1 inch per 8 feet of paved surface, and 3 inches per 10 feet of unpaved ground. Keep this in mind as we shape the yard.
Here’s a quick comparison of mounds and berms:
| Feature | Mounds | Berms |
|---|---|---|
| Size | Small (few feet long, foot tall) | Large (several yards long, tall) |
| Construction | DIY-friendly | Often requires machinery and pros |
| Purpose | Aesthetic, minor drainage control | Privacy, noise reduction, major drainage |
| Soil Required | Less | More |
Designing Your Drainage System on Paper
Gathering Property Information
Before we even think about digging, let’s get organized. We need to gather all the relevant information about our property. This includes things like the property lines, existing structures (house, garage, sheds), driveways, walkways, and any landscaping features like trees and planting beds. If you have a septic tank and leach field, it’s super important to note their locations and dimensions too. This information will form the basis of our drainage plan.
Creating a Detailed Site Plan
Now, let’s turn that information into a visual representation. We’ll need to create a detailed site plan, preferably to scale. This plan will serve as our roadmap for designing and installing the drainage system. You can often find a base map of your property from your local government or previous surveys. On this map, we’ll mark all the features we gathered earlier. It’s also a good idea to note the soil type in different areas of the yard, as this can affect drainage.
Determining Water Flow and Pressure
Next, we need to understand how water currently moves across our property. Where does the water come from during a heavy rain? Where does it pool? What are the natural slopes and drainage paths? We should also measure the water pressure and flow rate from our outdoor faucets. This information will help us determine the size and capacity of the drainage system we need. We can use arrows on our site plan to indicate the direction of water flow. Understanding the hydrozones is also important. Hydrozones are planting areas that will be irrigated.
Planning on paper helps us think the system through, guides us in ordering materials, and serves as a permanent record of where pipes are buried. It’s a crucial step to avoid costly mistakes and ensure our drainage system works effectively for years to come.
Advanced Drainage Solutions
Integrating Sprinkler and Drip Systems
We’ve found that combining drainage solutions with irrigation systems can be a game-changer for managing water effectively in our yards. Think of it as a way to both remove excess water and strategically deliver it when and where it’s needed. Drip systems, in particular, are great because they minimize water waste by delivering water slowly and directly to plant roots. We can even use the same trenches we’ve dug for drainage to run our irrigation lines, saving us time and effort.
- Drip irrigation can be tailored to individual plants, ensuring each gets the right amount of water.
- Sprinkler systems can be programmed to avoid watering during or after rain, preventing over-saturation.
- Combining systems helps maintain optimal soil moisture levels, promoting healthy plant growth.
By integrating our sprinkler and drip systems with our drainage plan, we’re not just getting rid of excess water; we’re also making sure our plants get exactly what they need, when they need it. It’s a win-win!
Planning for Heavy Runoff Scenarios
Let’s face it, sometimes we get hit with torrential downpours that can overwhelm even the best drainage systems. That’s why we always plan for the worst-case scenario. This means considering things like the intensity and duration of rainfall in our area, the slope of our yard, and the types of surfaces we have (pavement, grass, etc.). We might need to install larger pipes, add extra catch basins, or even create a dry well to handle extreme runoff events. It’s better to be over-prepared than to deal with a flooded yard!
- Assess historical rainfall data to understand peak runoff periods.
- Calculate the volume of water your drainage system needs to handle during heavy storms.
- Consider installing overflow outlets to prevent system backups.
Considering Professional Consultation
Sometimes, despite our best efforts, drainage problems can be complex and difficult to solve on our own. That’s when we know it’s time to call in the pros. A qualified landscape architect or drainage contractor can assess our property, identify the root causes of our drainage issues, and recommend solutions that are tailored to our specific needs. They can also help us navigate local building codes and obtain any necessary permits. While it might cost more upfront, hiring a professional can save us time, money, and headaches in the long run.
| Factor | DIY Approach | Professional Consultation |
|---|---|---|
| Cost | Lower initial cost | Higher initial cost |
| Expertise | Limited to our own knowledge and skills | Extensive knowledge and experience |
| Time Commitment | Significant time investment | Minimal time investment |
| Risk of Errors | Higher risk of mistakes and rework | Lower risk of errors and rework |
| Long-Term Effectiveness | May not be as effective as professional solutions | More likely to provide long-term, sustainable solutions |
Maintaining Your French Drain Diagram
After putting in all that work to design and install your French drain, it’s easy to think the job is done. But like any system, a French drain needs some love to keep working well. We’ve learned that regular maintenance is key to preventing headaches down the road. Let’s talk about how we can keep our French drains flowing smoothly.
Preventing Clogs and Blockages
One of the biggest enemies of a French drain is clogging. Over time, silt, leaves, and other debris can find their way into the system and reduce its effectiveness. Regularly clearing any surface debris near the drain’s entrance is a simple but effective way to prevent this.
Here’s a quick rundown of things we can do:
- Inspect the drain outlets regularly for any signs of blockage.
- Use a garden hose with a high-pressure nozzle to flush out the drainpipe.
- Consider installing a catch basin with a filter to trap debris before it enters the drain.
Regular Inspection and Upkeep
Regular check-ups can help us catch small problems before they become big ones. We usually try to inspect our drains after heavy rains to see how they’re performing.
Here’s what we look for:
- Slow drainage or standing water near the drain.
- Any signs of erosion or soil settling around the drain.
- Vegetation growing directly over the drain line, which could indicate a leak or blockage.
It’s a good idea to keep a record of your inspections, noting any issues you find and the actions you take to address them. This can help you track the performance of your drain over time and identify any recurring problems.
Extending the Lifespan of Your System
With proper care, a French drain can last for many years. Besides preventing clogs and regular inspections, there are a few other things we can do to extend its lifespan. For example, avoid driving heavy machinery over the drain field, as this can compact the soil and damage the pipe. Also, be mindful of what you plant near the drain. Deep-rooted trees can sometimes interfere with the drainpipe.
| Maintenance Task | Frequency | Benefits |
|---|---|---|
| Debris Removal | Monthly | Prevents clogs, maintains flow |
| Outlet Inspection | Quarterly | Identifies blockages early |
| High-Pressure Flushing | Annually | Clears accumulated silt and debris |
| Catch Basin Filter Check | Bi-Annually | Ensures filter is functioning, prevents debris from entering the system |
Keeping your French drain in good shape is super important to make sure it works right and keeps water away from your home. If you want to learn more about how to take care of your French drain or need help with it, check out our website. We have lots of tips and can even give you a free estimate!
Wrapping Things Up
So, there you have it. We’ve gone over the basics of French drains and how they can really help with those soggy spots in your yard. It might seem like a big job, but understanding the parts and why they work together makes it a lot less scary. We hope this helps you get a handle on your drainage issues. Remember, a dry yard is a happy yard, and with a little planning, you can make that happen.
Frequently Asked Questions
What exactly is a French drain?
A French drain is a trench with a pipe inside, usually wrapped in a special fabric and covered with gravel. It’s designed to collect extra water from your yard and move it to a spot where it won’t cause problems, like a dry well or a storm drain.
How do I know if my yard needs a French drain?
You’ll know you might need one if you have puddles that stick around after it rains, soggy spots in your lawn, or if water is pooling near your house’s foundation. These are all signs that water isn’t draining away properly.
What kind of pipes do you use for these drainage systems?
We typically use two main types: solid pipes that just move water from one place to another, and perforated pipes that have small holes to collect water along their path. The choice depends on what you’re trying to achieve with your drainage system.
What steps do you take before starting to dig?
Before we even think about digging, we always map out where the water needs to go. We also contact utility companies to make sure we don’t hit any underground lines. And, of course, we get all the necessary permits from the local building department.
How do you handle really wet spots or yards with hills?
For areas that are always wet, we might suggest a French drain with a perforated pipe to collect the water. For sloped yards, we can use a series of drains or even change the shape of the land to guide water away safely. We always try to make it look good with your landscaping too!
How do you plan out a drainage system?
We plan everything on paper first. This includes drawing out your property, figuring out where water naturally flows, and deciding the best spots for pipes and other drainage parts. It helps us make sure the system will work perfectly for your yard.
How do I keep my French drain from getting clogged?
To keep your French drain working well, it’s important to prevent leaves and dirt from getting into the system. Regular checks, especially after heavy rains, can help us catch any potential issues early and keep everything flowing smoothly.
Can I install a French drain myself, or should I hire a professional?
While some small drainage fixes can be a DIY project, complex issues, especially those involving slopes or large amounts of water, are best left to professionals. We have the right tools and knowledge to make sure the job is done correctly and safely.